
Using a Video Game Console to Control My Home

Why? Why did I do this? Over the years, I have seen many interesting people make things in the Smart Home sector. I felt like it was my turn, perhaps somewhat a rite of passage. I thought “a video game console is as good as a computer, actually they’re exactly the same!” And so I set myself the challenge.
So out of storage I dug out an old and dusty Sega Saturn. I never use it. I thought it might be fun to try and see what I could do. Also, with the recent developments in Sega Saturn flash cartridges, it gave me an easy opportunity to create something for the console. This could obviously be easily replicated on any console that allows for audio to be played. The new Summer Cart 64 looks quite tantalising..
Anyway, researching how to make it happen led me to https://www.jo-engine.org/home/ – if you’re looking to make homebrew for the Sega Saturn, you should go there and see what Johannes Fetz has put out for people to use. This project would have been much more difficult if not for his efforts in providing his libraries and compilers etc.
For the program design, I basically took what I use the most in my home, with Alexa, and decided that a menu to navigate would be the easiest way to go about things. Menus are easy and intuitive. I don’t know if there’s Sega Saturn text-to-speech, but that was outside of my scope. The UI developed along during the programming stage, and the “button” keys form part of the background graphic. I thought this was a nice (and easy) touch to allow easier navigation.
How to Download and Use
If you want to download the .iso I built using the Jo Engine, and try it (on emulator or real Sega Saturn hardware (I used yabause in the Jo Engine download package)), you can download it here.
The code I wrote can be found on github here: (I is italicised because Cursor really helped me a lot in making this, although I did of course make some code solo).
How to Modify
The project is released as version 0.4.5. It’s open source so do what you like. With the code on Github, it is important to have all the files necessary to build the game, or the Sega Saturn/Emulator will spit out many errors. Every image and audio file should be in a /cd directory, with .bin being the graphics and .pcm being the audio. Files needed to compile are as follows:
Graphics:
Arrow GraphicARW.BIN
Background GraphicBG.BIN
For the following, The format is “Menu Number – Button Number”MN1B1.BIN
MN1B2.BIN
MN1B3.BIN
MN1B4.BIN
MN1B5.BIN
MN1B6.BIN
MN2B1.BIN
MN2B2.BIN
MN2B3.BIN
MN2B4.BIN
MN2B5.BIN
MN2B6.BIN
MN3B1.BIN
MN3B2.BIN
MN3B3.BIN
MN3B4.BIN
MN3B5.BIN
MN3B6.BIN
Navigation (bottom row) buttons, one is for regular (inactive), and one is for when highlighted (active).NVB1.BIN
NVB1H.BIN
NVB2.BIN
NVB2H.BIN
NVB3.BIN
NVB3H.BIN
The following files are for audio, and use an AI replicated copy of my voice in my build to ask Alexa to do things. The format is “Menu Number – Button Number”, and the O suffix indicates it to be the Off command:MN1AU1.PCM
MN1AU1O.PCM
MN1AU2.PCM
MN1AU2O.PCM
MN1AU3.PCM
MN1AU3O.PCM
MN1AU4.PCM
MN1AU4O.PCM
MN1AU5.PCM
MN1AU5O.PCM
MN1AU6.PCM
MN1AU6O.PCM
MN2AU1.PCM
MN2AU1O.PCM
MN2AU2.PCM
MN2AU2O.PCM
MN2AU3.PCM
MN2AU3O.PCM
MN2AU4.PCM
MN2AU4O.PCM
MN2AU5.PCM
MN2AU5O.PCM
MN2AU6.PCM
MN2AU6O.PCM
MN3AU1.PCM
MN3AU1O.PCM
MN3AU2.PCM
MN3AU2O.PCM
MN3AU3.PCM
MN3AU3O.PCM
MN3AU4.PCM
MN3AU4O.PCM
MN3AU5.PCM
MN3AU5O.PCM
MN3AU6.PCM
MN3AU6O.PCM
“Stop!” Command:AUSTOP.PCM
You can convert images to .bin files using the Jo Engine map editor program that accompanies the Jo Engine download. Load a folder, and right click and image in the left pane to save as bin. You don’t have to pull them into the map and then save them.. which is something I learned halfway through the project.
The exact files I used can be replaced if you copy the code into Jo Engine using a project folder (I recommend the “audio” project folder so you don’t have to mess with libraries and stuff idk man this is the only one I could get to work and I might be missing something totally obvious but when I tried changing code in the demo1 folder provided audio just didn’t work, save for any graphics).
Also graphics have to have a width divisible by 8; this information cuts off when emulating, but I worked it out. Filenames are also limited to 8 characters long, minus the filetype.
If you have an Alexa and hook a Saturn up to the TV, or emulate it, the sound will come out of your speakers and allow you control over your devices. Of course, I used custom skills and routines for myself.
Integrating with an Alexa Device
Once the code was working, it was time to hack the Alexa. I did not want to have to listen to any commands being relayed between the Sega Saturn and the Alexa irl. As mentioned in the video, I was under the false assumption that I could build my own from a microcontroller (Raspberry Pi) because the Internet is littered with videos and instructions and tutorials on how to do so.
Take this one for example: https://www.ionos.co.uk/digitalguide/server/configuration/raspberry-pi-alexa/ – Step 2 just doesn’t exist any more.
There is also this page from Amazon: https://developer.amazon.com/en-US/alexa/devices/alexa-built-in/sdk – but clicking “Get Started” now is a 404 (or near enough)
https://alexa.github.io/avs-device-sdk/ – This is the alexa.github page, and hey look, the page’s 404.
It seems Amazon have shut down their Alexa AVS service, or.. I don’t know. If you have theories or knowledge, leave them in a YouTube comment I guess. But anyway, so I couldn’t build one, and with the program done, I was half tempted to say “in theory, look, it works on the real console, it can play audio, there’s potential to get into it somehow, or you can just press the buttons for your TV to play”. But I travelled too far down the road, and wanted to make it work.
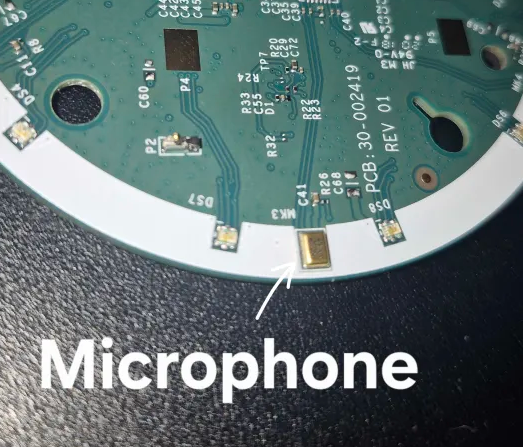
I found some schematics, for the Echo Dot 2 that I salvaged from an online second hand selling website, and just dived in, ripping off a microphone and wiring into it with the direct line in from the Sega Saturn (split using a composite cable).
I did intend on having some suggested “voltage security” but that ended up not working at all, so I literally just wired in the direct audio from the Sega Saturn into the Alexa device.

Colours of text/lines are only used to provide contrast to the background image.
I used female dupont-style jumper wires to these connections, and male ones from the composite cable so I could easily jump into it as and when I wanted to. I don’t see why anyone couldn’t do a similar thing if they wanted to with any computer or home console they choose. So if you see someone else make a YouTube video doing something similar, let me know so I can watch and maybe learn something 🙂
Pitfalls
To give some notes on some of the struggles I encountered, let’s start with the audio. For some reason I have no idea why, the sample rate quoted in the code is set at 32000hz, but when running on real hardware, some speeding up/slowing down takes place on the audio files. When converting my wav files to pcm using ffmpeg, I had to use 22050hz. It’s still not 1:1, but it works. The exact bat file I used to convert with ffmpeg is as follows:
@echo off
for %%f in (*.wav) do (
    ffmpeg -i "%%f" -f s16be -ar 22050 "%%~nf.PCM"
)
echo All WAV files have been transcoded to PCM! 🎉
Pause
I also had to put a pause at the end of Jo Engine’s compile.bat script, so I could monitor any problems that the process spat out. I strongly recommend doing that if you have a go.
Graphics have to have a width divisible by 8. Filenames I couldn’t get working past being 8 characters long, minus extension.
Bizhawk doesn’t like emulating it.
After compiling everything and having it in a working state, I had an uh-oh moment where I accidentally deleted all my source files. Backgrounds, images, everything. So I am unable to share them in their primary formats (.psd etc). I did try recovery tools such as Recuva, but nope, they just disappeared somewhere, and I still have no idea how.. Or where.
You’re likely able to rework the code to work with whatever home automation you use. It would have been nice to just relay some bleeps and bloops to a microcontroller and have that do it, for efficiency perhaps, but direct speech worked well enough for me.
Bugs Bugs Bugs
When I put the audio wires in when the console was switched on, the menu graphics bugged out; that’s why there’s a small reset in the video after it started working.
I could not get Jo Engine’s supposed highlight graphic function to work, so that’s why the NAV buttons are independent graphics.
If you navigate menus too quickly after playing an audio file, it will skip to the partway point of the other selection (I could not be bothered to fix this).
If there’s anything I wanted to do after the fact, it’s likely I’d change the arrow key graphic when a selection is made to give the user some visual feedback.
Thanks
And anyway, now, after all that, this project is over. I guess this is where the thanks come in.
Johannes Fetz, obviously, for the Jo Engine, thank you.
MVG for his reporting on console hacking efforts, and leaving me with the impression that I wanted a Saroo when he first uploaded his video 10 months ago, ultimately allowing me to open up this can of worms.
I’m not too familiar with the authors, but the developers of the SAROO.
Emerald Nova, for his mind-blowing livestreamed documentation of building Sega Saturn homebrew which I scrolled through a bit to make sure I was doing the right stuff in places.
My new YouTube members that have supported me for a long time: Shawn Spencer, Skull Fisher, and Deez Nuts.
And You.
Watch the video, and like and subscribe <3